Basic operation

The left hand side of the keyboard uses a Microchip MCP23018 IC, which is an I/O expander with open drain outputs and it can be configured through I2C or SPI. In this case we are going to focus on the I2C protocol only since it is the one used by the main MCU. The MCU is a Teensy 2.0 and it is placed on the right hand side of the Ergodox. It is used for monitoring all the switch status, converting the pressed switches into its corresponding character and sending it through USB to interact with the computer as a usual keyboard.

The MCP23018 has two different GPIO ports, GPIOA and GPIOB, each with 8 I/O pads. In the original Ergodox PCB, port A is used to interact with the columns and port B with the rows.
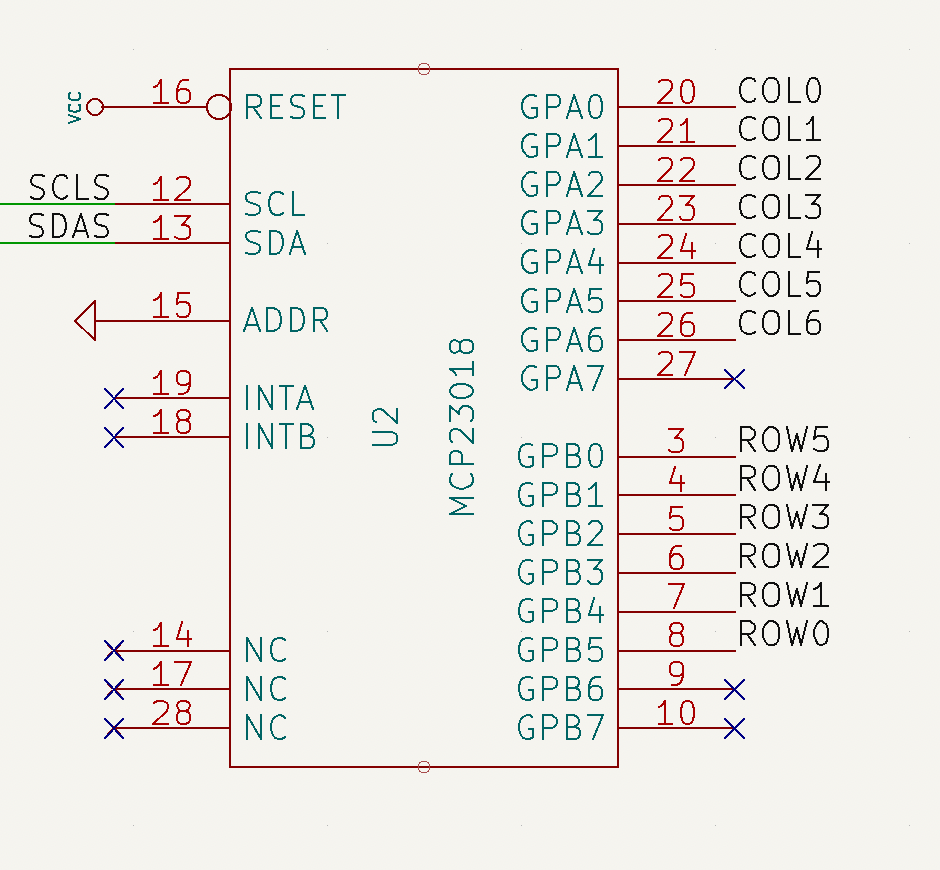
GPIO pads on port B (rows) are configured as inputs and the internal pull-up resistor is enabled on every port B pad. Regarding GPIO pads on port A, they are configured as outputs. According to the datasheet, output pads on the MCP23018 are open-drain, which basically means that the pad value can be internally driven to ground or left floating (high impedance). Since the rows and columns are connected through the mechanical switch and the diode, GPIO’s on port B can determine if the switch is closed (pressed) or open (released) depending on the voltage found at it. A diagram of this scheme is shown below.

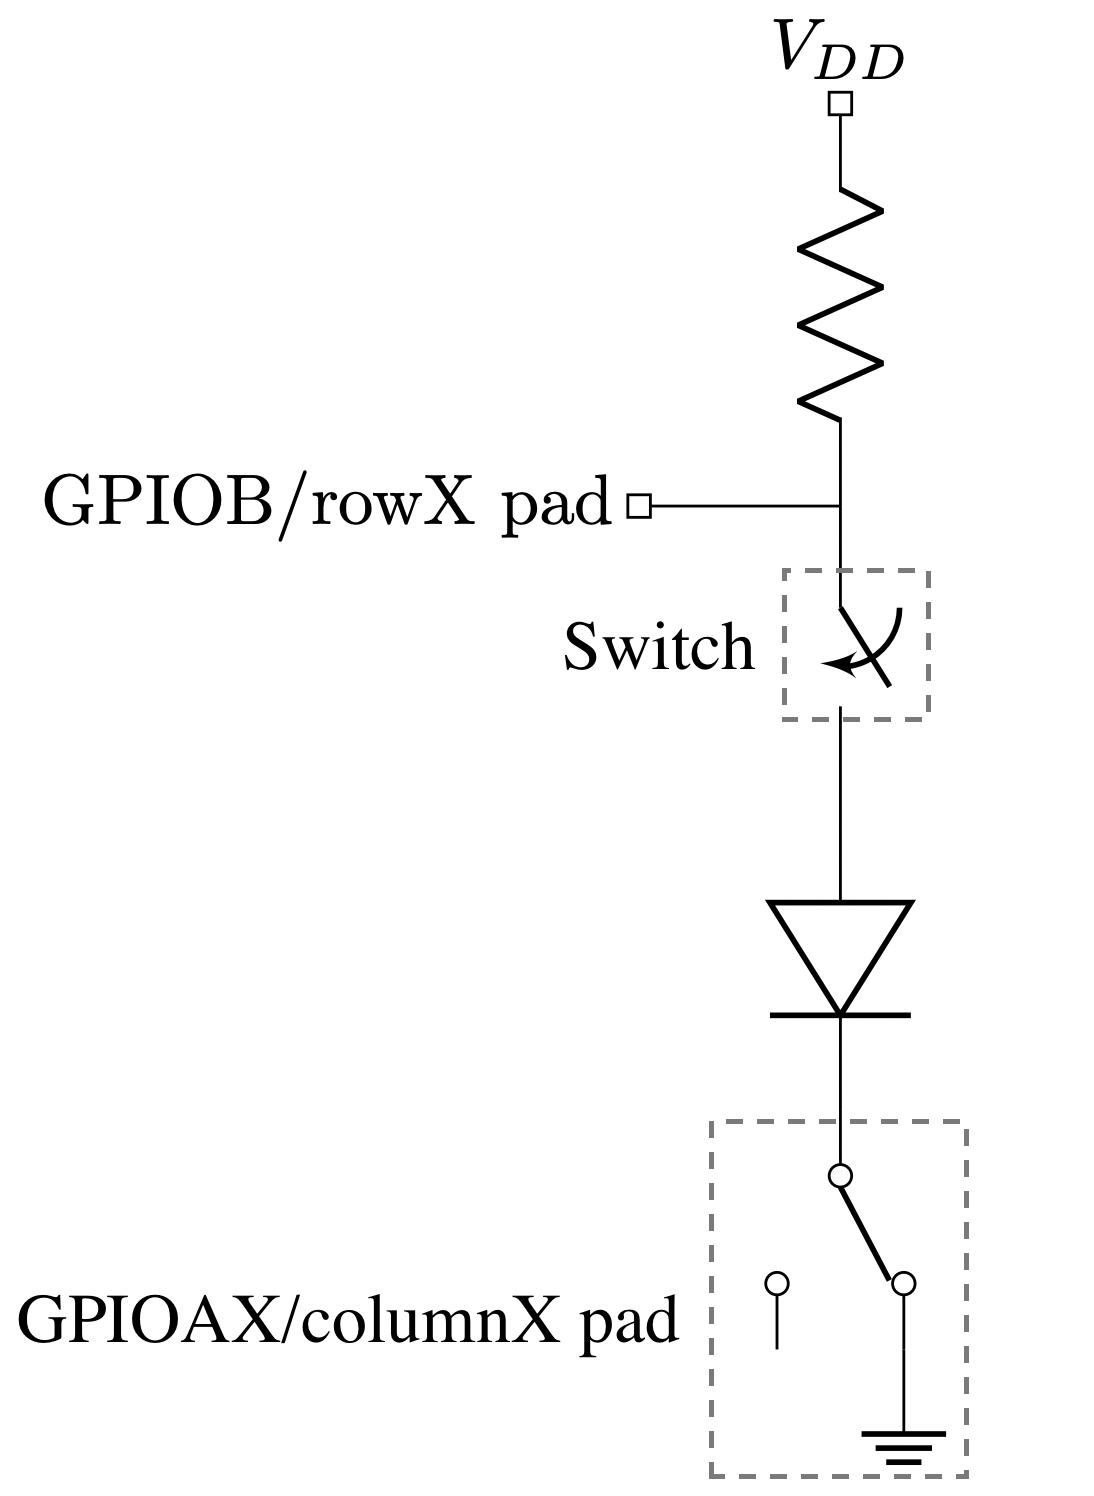
The way the Ergodox firmware determines the state of every switch (closed/pressed or open/released) is by sequentially setting one column to ground while leaving the rest floating. Then, the state of the rows is read. Depending on the state of the switch, the GPIOB reading will be:

  • If the switch is released, the voltage at GPIOB will be VDD due to its pull-up resistor. The pad value will be read as 1.
  • If the switch is closed, the voltage at GPIOB will be set to 0.0 V. The pad value will be read as 0.

Since the rest of columns are left floating, they won’t interfere on the reading. Once the state of a particular row is read, its value is stored and the operation is repeated until all the available rows are covered. The process of reading the state of all the switches is called a «scan».

Debugging MCP23018 with Arduino

When I assembled my Ergodox, I loaded the QMK firmware expecting the keyboard to just work. However, there seems to be a hardware issue since the comunication between the LHS and the RHS is not successful. Therefore, I decided to replicated the QMK firmware on an Arduino to have a better understanding on how the MCP and the Teensy interact together and also figure out if there’s really any hardware issue on the PCB’s.

QMK firmware is highly customizable and therefore it can be a little bit intricate when trying to read its code. I tried to distil the most basic functionality regarding the writing and reading done from the Teensy to the Mcp23018 through I2C.

The code below will perform a scan every 1 second and will print through the Serial interface the keyboard matrix result.

mcp23018_debug.c

#include <Wire.h>
#include "mcp23018.h"
#include "i2c_wrapper.h"
#include "utils.h"

#define KB_ROWS     6
#define KB_COLUMNS  7  // 14 in total, 7 in left hand side

int data;
bool matrix[KB_ROWS][KB_COLUMNS];

void setup() {
  Wire.begin();

  Serial.begin(9600);
  while (!Serial); // Leonardo: wait for Serial Monitor
  Serial.println("\nMCP23018 debugger");
  delay(2000);

  mcp23018_init();
}

void loop() {

  while(true) {
    // Clear matrix values
    clear_matrix();

    for (uint8_t col = 0; col < KB_COLUMNS; col++) {
      // Drive column to ground
      drive_column(col);
      // Read GPIO's on port B
      data = i2c_rd(I2C_ADDR, GPIOB);
      for (uint8_t row=0; row < KB_ROWS; row++) {
        // Store read values into the matrix
        matrix[row][col] = !( data & (1<<(5-row)) );
      }
    }

    print_matrix();
    // Leave column floating again
    drive_column_hiz();
    // Wait 1 second
    delay(1000);
  }

}

void drive_column(uint8_t col) {
   i2c_wr(I2C_ADDR, GPIOA, 0xFF & ~(1 << col));
}

void drive_column_hiz() {
  i2c_wr(I2C_ADDR, GPIOA, 0xFF);
}

void clear_matrix() {
  for (uint8_t row = 0; row < KB_ROWS; row++) {
    for (uint8_t col = 0; col < KB_COLUMNS; col++) {
       matrix[row][col] = 0;
    }
  }
}

void print_matrix() {
   for (uint8_t col = 0; col < KB_COLUMNS; col++) {
      if (col == 0) {
        Serial.println("[ ");
      }
      for (uint8_t row = 0; row < KB_ROWS; row++) {
         Serial.print(matrix[row][col] ? 1 : 0);
         Serial.print("  ");
      }
      Serial.println();
      if (col == 6) {
        Serial.println("]");
      }
   }
}

Output:

MCP23018 debugger
[ 
0  0  0  0  0  0  
0  0  0  0  1  0  
0  0  0  0  0  0  
0  0  0  0  0  0  
0  0  0  0  0  0  
0  0  0  0  0  0  
0  0  0  0  0  0  
]

where 1 means the switch is pressed and 0 released.

Auxiliary files

i2c_wrapper.h

#include <Wire.h>

int i2c_rd(int i2c_addr, int reg_addr) {
   int rd_data;
   // Start condition + 7 bit I2C device address
   Wire.beginTransmission(i2c_addr);
   // Write bit + next byte
   Wire.write(reg_addr);
   // Stop condition
   Wire.endTransmission();
   // Start condition + address + read bit
   Wire.requestFrom(i2c_addr, 1); // request 1 byte from slave device
   if(Wire.available()) {
    rd_data = Wire.read();
   }
   Wire.endTransmission();
   return rd_data;
}

int i2c_wr(int i2c_addr, int reg_addr, uint8_t wr_data) {
   // Start condition + 7 bit I2C device address
   Wire.beginTransmission(I2C_ADDR);
   // Byte with address to be written
   Wire.write(reg_addr);
   // Data to be written
   Wire.write(wr_data);
   // Stop condition
   return Wire.endTransmission();
}

mcp23018.h

#define I2C_ADDR        0b0100000
// i/o direction register
#define IODIRA          0x00
#define IODIRB          0x01
// GPIO pull-up resistor register
#define GPPUA           0x0C
#define GPPUB           0x0D
// general purpose i/o port register (write modifies OLAT)
#define GPIOA           0x12
#define GPIOB           0x13

utils.h

#ifndef _UINT8_T
#define _UINT8_T
typedef unsigned char uint8_t;
#endif /* _UINT8_T */

int print_addr_val(int addr, int val) {
    Serial.print("Addr ");
    Serial.print(addr, HEX);
    Serial.print(": ");
    Serial.println(val, BIN);
}


A = [1, 2, 3]
B = [4, 5]
C = [6, 7, 8]
# Visit all combinations of A, B and C values
all = [A, B, C]

# General pointer. Points to the current variable: 0 -> A, 1 -> B, ...
gp = 0
# Internal pointer. Points to the item on the current variable
# Example: gp = 1 --> B selected. ip = 2 --> B[2] selected --> B[2] = 5
ip = [0] * len(all)

def iterator(a):
# For Python to get gp from global scope
global gp
# Weird way in Python to create a for loop. Equivalent in C to:
# for(int i = 0; i < len(a[0]); i++)
for i in range(0, len(a[0])):
# Store current internal pointer
ip[gp] = i
# If a has more variables (e.g. a = [[1,2,3], [4,5], [6,7,8]])
if len(a) > 1:
# Create subset for the remaining variables, i.e. [[4,5], [6,7,8]]
# Pythonic way to create an array subset from a given index until
# end of the array
b = a[1:]
# Increase global index as we are about to sweep next variables
gp = gp + 1
# Iterate the rest of variables, i.e. [[4,5], [6,7,8]]
iterator(b)
# We came back from lower variables (B and C), so restoring global
# pointer to point again to A
gp = gp - 1
else:
# Just for result visualization purposes
str = "["
# External index and internal index
for i_ext, i_in in enumerate(ip):
str = str + "{}, ".format(all[i_ext][i_in])
# Remove last ", " and add closing ] (cosmetic)
str = str.strip(", ") + "]"
print("Indexes = {} --> Values: {}".format(ip, str))

# ip contains the indexes to all internal variables. Example:
# Iterating at A[3], B[2], C[1] --> ig = [3, 2, 1]


iterator(all)

Result

Given the input variables:

A = [1, 2, 3]
B = [4, 5]
C = [6, 7, 8]

the output of the script is as follows:

Indexes = [0, 0, 0] --> Values: [1, 4, 6]
Indexes = [0, 0, 1] --> Values: [1, 4, 7]
Indexes = [0, 0, 2] --> Values: [1, 4, 8]
Indexes = [0, 1, 0] --> Values: [1, 5, 6]
Indexes = [0, 1, 1] --> Values: [1, 5, 7]
Indexes = [0, 1, 2] --> Values: [1, 5, 8]
Indexes = [1, 0, 0] --> Values: [2, 4, 6]
Indexes = [1, 0, 1] --> Values: [2, 4, 7]
Indexes = [1, 0, 2] --> Values: [2, 4, 8]
Indexes = [1, 1, 0] --> Values: [2, 5, 6]
Indexes = [1, 1, 1] --> Values: [2, 5, 7]
Indexes = [1, 1, 2] --> Values: [2, 5, 8]
Indexes = [2, 0, 0] --> Values: [3, 4, 6]
Indexes = [2, 0, 1] --> Values: [3, 4, 7]
Indexes = [2, 0, 2] --> Values: [3, 4, 8]
Indexes = [2, 1, 0] --> Values: [3, 5, 6]
Indexes = [2, 1, 1] --> Values: [3, 5, 7]
Indexes = [2, 1, 2] --> Values: [3, 5, 8]

The following Python script extracts the content of an article using Readibility (ported to Python), converts it to voice using the Amazon Polly service and finally sends the audio as a voice note to a given user in Telegram using Telethon (Telegram client for Python).

For running the script you will need to install the following Python packages:

pip install boto3
pip install awscli
pip install readability-lxml
pip install telethon

Also, you will need to create a AWS account. If you already have an AWS account, make sure that you have a user created in the IAM Management Console with the following permissions:

User permissions for creating Polly jobs and accessing/writing files in a S3 bucket.

When creating this user, make sure you write down its ID access key and its secret access key. You will need them to configure the aws-cli client.

With this Amazon credentials, you can configure the AWS client by executing the following command:

aws configure

In this step, you will need to fulfill the details with the user credentials you wrote down when creating it.

Now, you will need to create a Telegram API ID. For this, you can go to the Telegram section «Create an Application«. After following the steps described in the official documentation, you will obtain an API ID (it’s a number) and a API hash (it’s a string).

With these steps already completed, you can place all the needed details in the script and run it.

import boto3
import textwrap
import requests
import re
from readability import Document
from telethon import TelegramClient, events, sync
import time
import os

#--------------------------------------------------------------------
# Configuration
#--------------------------------------------------------------------

##### Article #####
# Define URL
url = "PLACE_THE_URL_HERE"

##### Telegram #####
# Telegram API credentials
api_id = PLACE_API_ID_HERE
api_hash = 'PLACE_API_HASH_HERE'
# Telegram user to send messages
telegram_user = "PLACE_TELEGRAM_USER_HERE"
# Create Telegram client
telegram_client = TelegramClient('session_name', api_id, api_hash)
telegram_client.start()

##### AWS configuration #####
# Get S3 session
session = boto3.Session(profile_name='default')
# Get polly client
polly = session.client('polly')
# Create a S3 client to retrieve the file content
s3 = session.client('s3')
# Define bucket name
bucket_name = 'PLACE_BUCKET_NAME_HERE'
#--------------------------------------------------------------------
# Get HTML from the article
#--------------------------------------------------------------------

# Get HTML
response = requests.get(url)

# Extract content with Readibility
doc = Document(response.text)

# Get article body
html_text = doc.summary()

# Regular expression to identify HTML tags, e.g.:
html_tag_re = r"<\\?[^>]+>"

# Remove HTML tags from the article body
text_only = re.sub( html_tag_re, "", html_text,)

# Send message to user pointing to the URL that is going to be converted
telegram_client.send_message(telegram_user, "Converting: %s" % url)

#--------------------------------------------------------------------
# Convert text to voice
#--------------------------------------------------------------------

# Start Polly task to save in a Bucket
resp = polly.start_speech_synthesis_task(OutputFormat='mp3',
OutputS3BucketName=bucket_name,
Text=text_only,
VoiceId='Enrique')

# Get Polly task
task = polly.get_speech_synthesis_task(TaskId=resp['SynthesisTask']['TaskId'])

# Monitor task status until it is completed
while task['SynthesisTask']['TaskStatus'] != 'completed':
# Wait 2 seconds between server poll
time.sleep(2)
# Get Polly task
task = polly.get_speech_synthesis_task(TaskId=task['SynthesisTask']['TaskId'])
# Print the status of the task
print("Task status: %s" % task['SynthesisTask']['TaskStatus'])

print("Task completed!")

#--------------------------------------------------------------------
# Retrieve file and send to Telegram user
#--------------------------------------------------------------------

# Regular expression to extract the key (file name) of the synthesized file
key_re = r'/([0-9A-Za-z-.]+)$'
# Search the regular expression in the OutputUri
regex_search = re.search(key_re, task['SynthesisTask']['OutputUri'])
# Take only the first group of the re (key)
file_key = regex_search.group(1)

# Get file name to store in local
title_sanitized = doc.short_title().replace('"', '')
title_sanitized = title_sanitized.replace(':', '')
file_name = "%s.mp3" % title_sanitized

# Download file from the bucket and store it in a MP3 local file
with open(file_name, 'wb') as data:
s3.download_fileobj(bucket_name, file_key, data)

# Delete remote bucket file
s3.delete_object(Bucket=bucket_name,Key=file_key)
# Delete local file
if os.path.isfile(file_key):
os.remove(file_key)

# Send MP3 file as a voice note to the telegram user
telegram_client.send_file(telegram_user, file_name, voice_note=True)
# Send signature
telegram_client.send_message(telegram_user, "Message sent from Romancero bot.")

The user you specified will receive a message like this:

You can use regular expressions in PHP with the function preg_match ( string $pattern , string $subject [, array &$matches [, int $flags = 0 [, int $offset = 0 ]]] ) . Only the first two paremeters are mandatory and they are the regex and the string where you want to search respectively.

In case of finding a result, preg_match() returns an array where the item at index 0 is the whole match. From 1 onwards they are placed the different groups of your regular expressions (in case there is any). If no match is found, preg_match() returns null.

One of the details that must be taken into account when using regular expressions on PHP is that they must be enclosed by forward slashes (/), e.g. $multiline_meaning_re = ‘/^([A-za-z ,»().\’;:]+)/’; . This regular expression matches any string with any set of letters, spaces, commas, double and single quotes, parenthesis points, colon and/or semicolon.

As a complete example, the following snippet opens a file, parses it to look for English idioms and uploads all of them a MySQL database.

<?php
$servername = "";
$database = "";
$username = "";
$password = "";
$conn = mysqli_connect($servername, $username, $password, $database);

// Check connection
if (!$conn) {
    die("Connection failed: " . mysqli_connect_error());
}

    class Idiom {
        var $idiom = "";
        var $meaning = "";
        var $example = [];
        function print(){
            echo($this->idiom . "<br>" . $this->meaning . "<ul>");
            print_r($this->example);
            if(count($this->example) == 0 )
              echo("ERROR!!!!. There should be at least one example");
            foreach ($this->example as $value) {
                echo("<li>" . $value . "</li>");
            }
            echo("</ul>");
        }
        function upload($conn){
          echo("Uploading...");
          $example = "<ul class='list-group'>";
          foreach ($this->example as $value) {
            if($value !== '')
              $example = $example . "<li class='list-group-item'>" . $value . '</li>';
          }
          $example = $example . "</ul>";

          $idiom = mysqli_real_escape_string($conn, $this->idiom);
          $meaning = mysqli_real_escape_string($conn, $this->meaning);
          $example = mysqli_real_escape_string($conn, $example);

          $query = 'INSERT INTO idioms (`idiom`, `meaning`, `example`) VALUES ("'. $idiom . '","'. $meaning . '","'. $example . '")';
          mysqli_query($conn, $query);
        }
    }

    $file = fopen("idioms.txt", "r") or die("Unable to open file!");
    $idiom_meaning_re     = '/^([A-za-z,. -\/()\']+):([A-za-z ,"().\';:\n]+)/';
    $multiline_meaning_re = '/^([A-za-z ,"().\';:]+)/';
    $example_re           = '/^\|--([A-Za-z0-9 \',?.-;$\n"]+[^:])/';
    $new_idiom = 0;
    $new_example = 0;
    $idiom = null;
    $example = "";
    // Output one line until end-of-file
    while(!feof($file)) {
      $line = fgets($file);
      //echo($line . "<br>");
      preg_match($idiom_meaning_re, $line, $matches);

      if($matches != null){
        if($new_example === 1){
          array_push($idiom->example, $example);
          $new_example = 0;
        }
        if($idiom != null){
          $idiom->print();
          $idiom->upload($conn);
        }
        $idiom = new Idiom;
        $idiom->example = [];
        $example = "";
        $new_idiom = 1;
        $idiom->idiom = trim($matches[1]);
        $idiom->meaning = trim($matches[2]);
      }else{
        preg_match($example_re, $line, $matches);
        if($matches != null){
           if($example !== "")
              array_push($idiom->example, $example);
           $new_idiom = 0;
           $new_example = 1;
           $example = trim($matches[1]);
        }else{
          preg_match($multiline_meaning_re, $line, $matches);
          //var_dump($matches);
          if($matches != null && $new_idiom){
            $idiom->meaning = $idiom->meaning . ' ' . trim($matches[1]);
            //echo($idiom->meaning);
          } elseif ($matches != null && $new_example) {
            $example = $example . ' ' . trim($matches[1]);
          } else {
            $new_idiom   = 0;
            $new_example = 0;
          }
        }
      }
    }
    echo("Closing file");
    fclose($file);

    mysqli_close($conn);

?>

You can find further information about the preg_match() in the PHP official documentation.

One of the first questions you may ask yourself when getting introduced in D3 is: why are we using selectAll(‘html-tag-name’) method if there is no item to select of that type?

First, let’s see an example of the situation we are talking about:

<body>
  <script>
    const dataset = [12, 31, 22, 17, 25, 18, 29, 14, 9];
    
    // Add your code below this line
    d3.select('body')
      .selectAll('h2')
      .data(dataset)
      .enter()
      .append('h2')
      .text('New Title')
    // Add your code above this line
  </script>
</body>

In the previous example, the only existing HTML tag is <body> . We select body (d3.select(‘body’) ) and then we perform the .selectAll(‘h2’) . On its own, it makes no sense as the method won’t return any value since no <h2>  tag exists. Nevertheless, it will make sense if we keep looking at the following code.

After the select .selectAll(‘h2’)  we attach the existing dataset to the selected items (.data(dataset) ). Then, we use the enter()  method, which gives meaning to the previous .selectAll(‘h2’) . When using enter() , D3 looks for the number of selected items to bind them with the data. In case of having not enough items in the selection, the enter()  method will create them.

Therefore, as .selectAll(‘h2’)  was empty and the dataset  variable contains 9 elements, it will iterate the code 9 times. In case of having already created some  <h2>  elements, it will simply fulfill the HTML code the necessary iteration to cover all the dataset  elements. Remember that who does this iteration is  the data() method.  It parses the data set, and any method that’s chained after data() is run once for each item in the data set.

You can find more information in the official documentation at the D3js.org website.

Scales

In D3 there exists the Scale function to change the value of the data set so that it can fit in the screen. Two important methods are range() and domain(). The domain method covers the set of input values whereas the range function convers the set of output values. Let’s see an example:

const scale = d3.scaleLinear();
scale.domain([50, 480]);
scale.range([10, 500]);

scale(50) // Returns 10
scale(480) // Returns 500
scale(325) // Returns 323.37
scale(750) // Returns 807.67

From freeCodeCamp:

The domain()  method passes information to the scale about the raw data values for the plot. The range()  method gives it information about the actual space on the web page for the visualization.

#!/usr/bin/env python
# -*- coding: utf-8 -*-

import scrapy
import re

title_regex       = r'Letra de\s+([a-zA-Z0-9áéíóúñü_,!¡¿?"() ]+)\s-'
empty_lines_regex = r"^\s+$"
tabs_regex        = r"^[\n\t]+"

class ConchaPiquerSpider(scrapy.Spider):
    name = 'conchitabot'
    allowed_domain = ['http://www.coveralia.com']
    start_urls = ['http://www.coveralia.com/letras-de/concha-piquer.php']
    custom_settings = {
        'FEED_EXPORT_ENCODING': 'utf-8',
    }
    BASE_URL = 'http://www.coveralia.com'
    def parse(self, response):
        lyric_links = response.css(".lista_uno li a::attr(href)").extract()
        for link in lyric_links:
            absolute_url = self.BASE_URL + link
            yield scrapy.Request(absolute_url, callback=self.parse_lyric)
        lyric_names_raw = response.css(".lista_uno li a::text").extract()


    def parse_lyric(self,response):
        raw_titles = response.css("h1").extract()
        for raw_title in raw_titles:
            match = re.search(title_regex, raw_title.encode("utf-8"))
            if match:
                title = match.group(1)
        raw_text = response.css("#HOTWordsTxt::text").extract()
        encoded_text = []
        single_string = ""
        for item_text in raw_text:
            single_string = single_string + item_text

        lyric = self.clean_lyric(single_string)

        text_file = open("./letras/" + title + ".txt", "w")
        text_file.write(lyric)
        text_file.close()

    def clean_lyric(self,dirty_str):
        encoded = dirty_str.encode("utf-8")
        no_spaces = re.sub(r"^\s+", '', encoded)
        no_tabs = re.sub(r"[\n\t]+", '', no_spaces)
        return no_tabs
#!/usr/bin/env python
# -*- coding: utf-8 -*-

import os
import re

def get_sorted_files(Directory):
    filenamelist = []
    for root, dirs, files in os.walk(Directory):
        for name in files:
            fullname = os.path.join(root, name)
            filenamelist.append(fullname)
    return sorted(filenamelist)

text = "<head><meta charset='utf-8'>"
folder = "./letras/"
files = get_sorted_files(folder)
for filename in files:
    filebase = re.sub(folder, "", filename)
    filebase = re.sub("\..*$", "", filebase)
    with open(filename,'r') as f:
        text = text + "<h1>" + filebase + "</h1><pre>" + f.read() + "</pre>"

unified = open("unified.html", "w")
unified.write(text)
unified.close()

minted es un paquete de LaTeX que permite añadir código a tu documento y mostrarlo resaltado. Minted utiliza Python para compilar, por lo que el primer paso es instalar Python 2.6 o superior.

  1. Instalar Python
  2. Añadir la ruta de Python a las variables del entorno de Windows.
    1. Botón derecho en el icono de Windows.
    2. Sistema
    3. En el buscador añadir «variables» y clickar en «Editar variables del sistema».
    4. Clickar en Variables del entorno.
    5. En Variables del sistema, añadir a la entrada Path la localización de la carpeta Scripts de Python. En mi caso está en D:\Windows\Python\Python36-32\Scripts. Es muy probable que este paso no sea necesario en tu sistema y que al instalar Python ya se haya añadido la ruta a las variables del sistema. Si al ejecutar python en CMD da un error, entonces este paso es obligatorio.
    6. Instalar pip.
    7. Instalar pygments:
      1. Abrir CMD en Windows y escribir: pip install Pygments
      2. Probar que se ha instalado correctamente escribiendo en CMD pygmentize -h
    8. Ahora desde TexStudio hay que modificar la llamada al compilador de LaTeX.
      1. Opciones > Configurar TeXStudio > Órdenes
      2. Modificar las entradas LaTeX y PdfLaTeX por: latex.exe -src -interaction=nonstopmode -shell-escape %.tex y pdflatex.exe -synctex=1 -interaction=nonstopmode -shell-escape %.tex respectivamente. De esta manera se añade la etiqueta -shell-escape después de -interaction=nonstopmode
      3. Cerrar TeXStudio
      4. Abrir de nuevo

Y si no ha habido ningún problema en los pasos anteriores, se debería poder compilar utilizando minted. Para más información, visitad la guía de instalación de minted.

\begin{minted}[mathescape,
linenos,
numbersep=8pt,
gobble=0,
frame=lines,
framesep=2mm]{csharp}
    public static int width = 64;	// Landscape width
    public static int height = 128;	// Landscape height
    public static int depth = 64;	// Landscape depth
    public int heightScale = 20;	// Maximum terrain's height
    public float detailScale = 25.0f;
    public Transform vrCamera;
    public GameObject grassBlock;	// Grass block object
    Block[,,] worldBlocks = new Block[width, height, depth];// 3D array with blocks
\end{minted}


Una manera sencilla de realizar FFT desde cualquier sistema operativo sin necesidad de disponer de programas como MATLAB, Octave o Mathematica, es utilizando un script de Python. Este lenguaje cuenta con la ventaja de ser muy sencillo y además de disponer una ingente cantidad de librerías para poder hacer casi cualquier cosa.
El objetivo de este pequeño programa es realizar una FFT de un trozo de audio grabado directamente desde un micrófono. Para ello se realiza una escucha pasiva a la espera de un sonido cuyo volumen esté por encima de un determinado umbral. Este umbral se puede modificar con la variable threshold, y dependiendo del micrófono y su sensibilidad debe de ser ajustado de manera diferente. Una vez detectado, se graba unos pocos segundos de audio, cuya longitud puede ser modificada en el segundo bucle for. Actualmente graba aproximadamente 1 segundo, pero si se cambia el 7 por un 100 la longitud es de 13 segundos.
El audio se guarda como un archivo para ser posteriormente utilizado en el cálculo de la FFT y ser graficada al momento. Todo este procedimiento está dentro de un bucle infinito, por lo que, aunque la ventana de la gráfica es bloqueante, está continuamente escuchando.

Las librerías necesarias para poder ejecutar este script son: numpy, matplotlib, pyaudio y scipy.

#!/usr/bin/python
# -*- coding: utf-8 -*-
 
import pyaudio
import struct
import math
import wave
import numpy as np
import matplotlib.pyplot as plt
from scipy.io import wavfile
#import urllib  
#import urllib2 
import os
 
class Microphone:
 
    def rms(self,frame):
        count = len(frame)/2
        format = "%dh"%(count)
        shorts = struct.unpack( format, frame )
        sum_squares = 0.0
        for sample in shorts:
            n = sample * (1.0/32768.0)
            sum_squares += n*n
        rms = math.pow(sum_squares/count,0.5);
        return rms * 1000
 
 
    def passiveListen(self,persona):
 
        CHUNK = 1024; RATE = 8000; THRESHOLD = 200; LISTEN_TIME = 5
 
        didDetect = False
 
        # prepare recording stream
        p = pyaudio.PyAudio()
        stream = p.open(format=pyaudio.paInt16, channels=1, rate=RATE, input=True, frames_per_buffer=CHUNK)
 
        # stores the audio data
        all =[]
 
        # starts passive listening for disturbances 
        print RATE / CHUNK * LISTEN_TIME
        for i in range(0, RATE / CHUNK * LISTEN_TIME):
            input = stream.read(CHUNK)
            rms_value = self.rms(input)
            print rms_value
            if (rms_value < THRESHOLD):
                didDetect = True
                print "Listening...\n"
                break
 
        if not didDetect:
            stream.stop_stream()
            stream.close()
            return False
 
 
        # append all the chunks
        all.append(input)
        for i in range(0, 7):
            data = stream.read(CHUNK)
            all.append(data)
 
        # save the audio data   
        data = ''.join(all)
        stream.stop_stream()
        stream.close()
        wf = wave.open('audio.wav', 'wb')
        wf.setnchannels(1)
        wf.setsampwidth(p.get_sample_size(pyaudio.paInt16))
        wf.setframerate(RATE)
        wf.writeframes(data)
        wf.close()
 
        return True
 
if __name__ == '__main__':
    mic = Microphone()
    while True:
        if  mic.passiveListen('ok Google'):
            fs, data = wavfile.read('audio.wav')
            L = len(data)
            c = np.fft.fft(data) # create a list of complex number
            freq = np.fft.fftfreq(L)
            #freq = np.linspace(0, 1/(2L), L/2)
            print freq
            freq_in_hertz = abs(freq * fs)
            plt.plot(freq_in_hertz, abs(c))
            plt.show()