Also, you will need to create a AWS account. If you already have an AWS account, make sure that you have a user created in the IAM Management Console with the following permissions:
User permissions for creating Polly jobs and accessing/writing files in a S3 bucket.
When creating this user, make sure you write down its ID access key and its secret access key. You will need them to configure the aws-cli client.
With this Amazon credentials, you can configure the AWS client by executing the following command:
aws configure
In this step, you will need to fulfill the details with the user credentials you wrote down when creating it.
Now, you will need to create a Telegram API ID. For this, you can go to the Telegram section «Create an Application«. After following the steps described in the official documentation, you will obtain an API ID (it’s a number) and a API hash (it’s a string).
With these steps already completed, you can place all the needed details in the script and run it.
import boto3
import textwrap
import requests
import re
from readability import Document
from telethon import TelegramClient, events, sync
import time
import os
#--------------------------------------------------------------------
# Configuration
#--------------------------------------------------------------------
##### Article #####
# Define URL
url = "PLACE_THE_URL_HERE"
##### Telegram #####
# Telegram API credentials
api_id = PLACE_API_ID_HERE
api_hash = 'PLACE_API_HASH_HERE'
# Telegram user to send messages
telegram_user = "PLACE_TELEGRAM_USER_HERE"
# Create Telegram client
telegram_client = TelegramClient('session_name', api_id, api_hash)
telegram_client.start()
##### AWS configuration #####
# Get S3 session
session = boto3.Session(profile_name='default')
# Get polly client
polly = session.client('polly')
# Create a S3 client to retrieve the file content
s3 = session.client('s3')
# Define bucket name
bucket_name = 'PLACE_BUCKET_NAME_HERE'
#--------------------------------------------------------------------
# Get HTML from the article
#--------------------------------------------------------------------
# Get HTML
response = requests.get(url)
# Extract content with Readibility
doc = Document(response.text)
# Get article body
html_text = doc.summary()
# Regular expression to identify HTML tags, e.g.:
html_tag_re = r"<\\?[^>]+>"
# Remove HTML tags from the article body
text_only = re.sub( html_tag_re, "", html_text,)
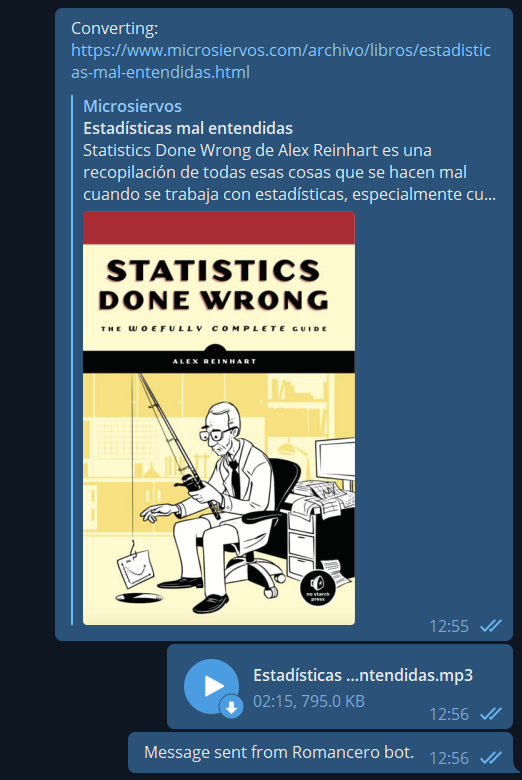
# Send message to user pointing to the URL that is going to be converted
telegram_client.send_message(telegram_user, "Converting: %s" % url)
#--------------------------------------------------------------------
# Convert text to voice
#--------------------------------------------------------------------
# Start Polly task to save in a Bucket
resp = polly.start_speech_synthesis_task(OutputFormat='mp3',
OutputS3BucketName=bucket_name,
Text=text_only,
VoiceId='Enrique')
# Get Polly task
task = polly.get_speech_synthesis_task(TaskId=resp['SynthesisTask']['TaskId'])
# Monitor task status until it is completed
while task['SynthesisTask']['TaskStatus'] != 'completed':
# Wait 2 seconds between server poll
time.sleep(2)
# Get Polly task
task = polly.get_speech_synthesis_task(TaskId=task['SynthesisTask']['TaskId'])
# Print the status of the task
print("Task status: %s" % task['SynthesisTask']['TaskStatus'])
print("Task completed!")
#--------------------------------------------------------------------
# Retrieve file and send to Telegram user
#--------------------------------------------------------------------
# Regular expression to extract the key (file name) of the synthesized file
key_re = r'/([0-9A-Za-z-.]+)$'
# Search the regular expression in the OutputUri
regex_search = re.search(key_re, task['SynthesisTask']['OutputUri'])
# Take only the first group of the re (key)
file_key = regex_search.group(1)
# Get file name to store in local
title_sanitized = doc.short_title().replace('"', '')
title_sanitized = title_sanitized.replace(':', '')
file_name = "%s.mp3" % title_sanitized
# Download file from the bucket and store it in a MP3 local file
with open(file_name, 'wb') as data:
s3.download_fileobj(bucket_name, file_key, data)
# Delete remote bucket file
s3.delete_object(Bucket=bucket_name,Key=file_key)
# Delete local file
if os.path.isfile(file_key):
os.remove(file_key)
# Send MP3 file as a voice note to the telegram user
telegram_client.send_file(telegram_user, file_name, voice_note=True)
# Send signature
telegram_client.send_message(telegram_user, "Message sent from Romancero bot.")
The user you specified will receive a message like this:
You can use regular expressions in PHP with the function preg_match ( string $pattern , string $subject [, array &$matches [, int $flags = 0 [, int $offset = 0 ]]] ) . Only the first two paremeters are mandatory and they are the regex and the string where you want to search respectively.
In case of finding a result, preg_match() returns an array where the item at index 0 is the whole match. From 1 onwards they are placed the different groups of your regular expressions (in case there is any). If no match is found, preg_match() returns null.
One of the details that must be taken into account when using regular expressions on PHP is that they must be enclosed by forward slashes (/), e.g. $multiline_meaning_re = ‘/^([A-za-z ,»().\’;:]+)/’; . This regular expression matches any string with any set of letters, spaces, commas, double and single quotes, parenthesis points, colon and/or semicolon.
As a complete example, the following snippet opens a file, parses it to look for English idioms and uploads all of them a MySQL database.
One of the first questions you may ask yourself when getting introduced in D3 is: why are we using selectAll(‘html-tag-name’) method if there is no item to select of that type?
First, let’s see an example of the situation we are talking about:
<body>
  <script>
    const dataset = [12, 31, 22, 17, 25, 18, 29, 14, 9];

    // Add your code below this line
    d3.select('body')
      .selectAll('h2')
      .data(dataset)
      .enter()
      .append('h2')
      .text('New Title')
    // Add your code above this line
  </script>
</body>
In the previous example, the only existing HTML tag is <body> . We select body (d3.select(‘body’) ) and then we perform the .selectAll(‘h2’) . On its own, it makes no sense as the method won’t return any value since no <h2> tag exists. Nevertheless, it will make sense if we keep looking at the following code.
After the select .selectAll(‘h2’) we attach the existing dataset to the selected items (.data(dataset) ). Then, we use the enter() method, which gives meaning to the previous .selectAll(‘h2’) . When using enter() , D3 looks for the number of selected items to bind them with the data. In case of having not enough items in the selection, the enter() method will create them.
Therefore, as .selectAll(‘h2’) was empty and the dataset variable contains 9 elements, it will iterate the code 9 times. In case of having already created some <h2> elements, it will simply fulfill the HTML code the necessary iteration to cover all the dataset elements. Remember that who does this iteration is the data() method. It parses the data set, and any method that’s chained after data() is run once for each item in the data set.
In D3 there exists the Scale function to change the value of the data set so that it can fit in the screen. Two important methods are range() and domain(). The domain method covers the set of input values whereas the range function convers the set of output values. Let’s see an example:
The domain() method passes information to the scale about the raw data values for the plot. The range() method gives it information about the actual space on the web page for the visualization.
Platform used: Raspberry Pi 3 B+ Bluetooth module: built-in
First, update firmware to make sure you have latest version:
sudo rpi-update
Now, install all the needed pulse-audio packages:
sudo apt install pulseaudio-*.
Configure the bluetooth in the Raspberry:
pi@raspberrypi:~ $ bluetoothctl
[NEW] Controller XX:XX:XX:XX:XX:XX raspberrypi [default]
[bluetooth]# power on
Changing power on succeeded
[bluetooth]# agent NoInputNoOutput
Agent registered
[bluetooth]# default-agent
Default agent request successful
[bluetooth]# discoverable on
Changing discoverable on succeeded
[CHG] Controller B8:27:EB:DB:58:46 Discoverable: yes
[bluetooth]# pairable on
Changing pairable on succeeded
In your mobile phone, search for the raspberry bluetooth signal and pair to it:
[Noname]# connect XX:XX:XX:XX:XX:XX
Attempting to connect to XX:XX:XX:XX:XX:XX
[CHG] Device XX:XX:XX:XX:XX:XX ServicesResolved: yes
Connection successful
[Noname]# trust XX:XX:XX:XX:XX:XX
Changing XX:XX:XX:XX:XX:XX trust succeeded
[CHG] Controller XX:XX:XX:XX:XX:XX Discoverable: no
[Noname]# exit
Now, you can try to play some audio in your mobile and it should be reproduced in the the Raspberry.
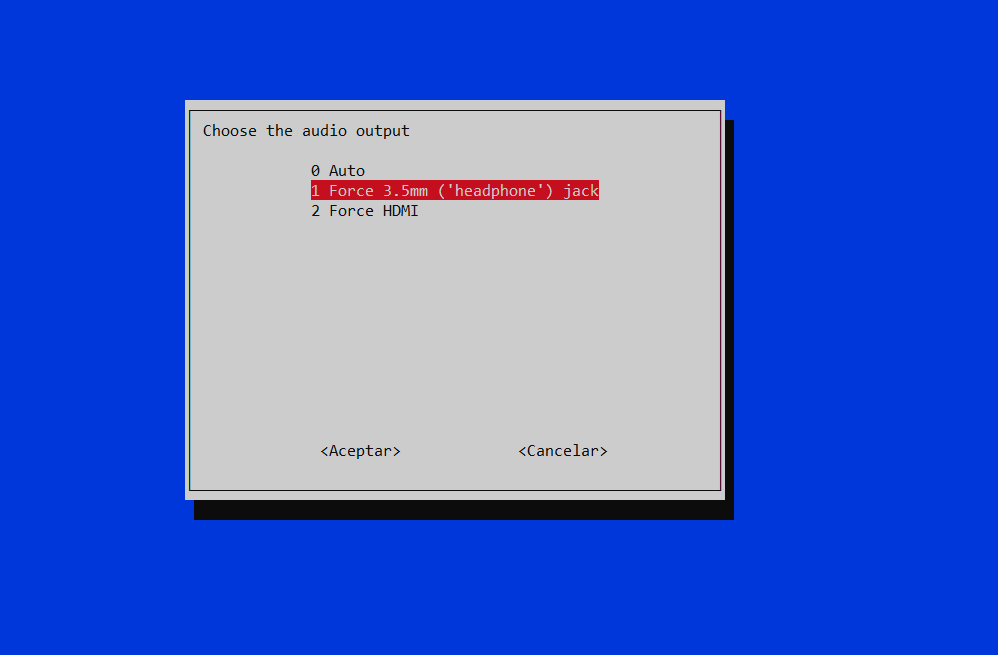
In my case, audio was driven out to the HDMI. In case you want to switch it through the Jack 3.5 mm output you can run:
sudo raspi-config
Then, select Advanced Options > Audio > Force 3.5 mm (‘headphone’) jack With this all set, you can stream any audio such as the built-in music player, Spotify or YouTube to the Raspberry and from it to the connected speakers or HDMI display.
Finally, as the device has been stored as a trusted device, every time the Raspberry is booted, you won’t need to repeat this process. It will be so easy as connecting your mobile phone to the available raspberry bluetooth signal.
If sound sounds distorted, try restarting pulseaudio with:
pulseaudio -k
Handling with several devices
If you pair several devices, only first connected device will be able to stream audio. If I connect my computer to the raspberry and then I try to connect my mobile phone (both previously paired and trusted), phone connection will fail. First, I’ll need to disconenct my computer and only then I’ll be able to successfully connect to the raspberry with my mobile phone.
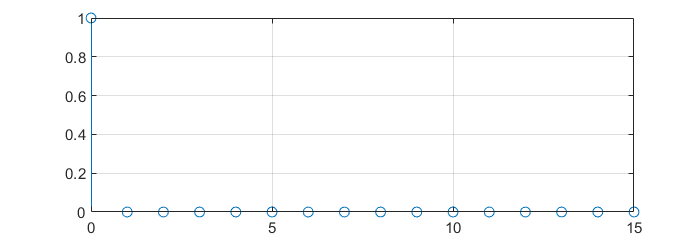 \[X\left[k\right] = \sum_{n=0}^{N-1}{\delta\left[n\right] e^{-j\frac{2\pi}{N}nk}}\]
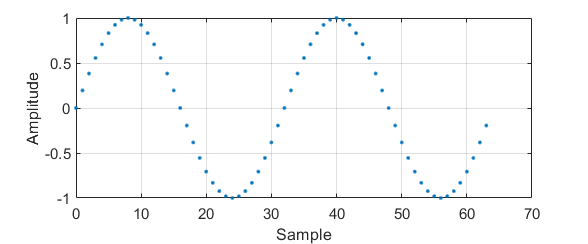
 DFT of a cosine