In Design Verification (DV), a test is a set of stimuli that exercises the Design Under Test (DUT). The purpose of the test is to verify one or more specs and/or functionalities, so to be methodogically strict, it is absolutely mandatory for the test to contain checkers that deterministically asserts whether the design is behaving as expected or not. Otherwise, the test will not have more use than help you to prepare some nice waveforms or dangerously give you a false confidence of higher functional and code coverage.
Usually, the testcase has a fixed amount of instructions or actions to do over the DUT. This might vary slightly in the case of generating randomly the data to inject into the design, but the steps to take will be known upfront. In the case of having to fulfill some functional coverage such as covergroups, it is possible that a single run won’t be able to hit all possible scenarios that a covergroup requires to get 100% coverage. One way to overcome this is to increase the number of runs of the same test to expand the hit scenarios. However, it is not always clear how many of these are going to be required in order to reach the coverage goals. You can try increasing little by little the number of runs/seeds until you get a stable figure of coverage throughout several consecutive regressions or you can take a shortcut and increase dramatically the number of seeds. Both approaches present drawbacks however. The trial and error approach requires time which you might not have. Depending on the duration of the test and the number of runs, it may take you days to figure out what is the minimum number of tests required since each regression may take several hours. On the other hand, the «all-in» strategy may be consuming unnecessary computional resources since you might be running several orders of magnitude more tests than the ones it was actually required.
The purpose of this post is to elaborate on a way in which the functional coverage can dictate whether the test must keep trying new scenarios and in turn exercising the DUT any further or stop the simulation. This can be easily done on custom made SystemVerilog testbenches, but it is way more interesting analysing how to do this using the Universal Verification Methodology (UVM) as it is the most widely used verification framework in the semiconductor industry.
The DUT, SystemVerilog testbench and UVM environment architecture presented in this post is the simplest possible. The only purpose of them is to serve as a vehicle to illustrate the mentioned approach. Also, all the code shown in this article has been uploaded to the GitHub repo uvm-cg-driven in case you just want to dive directly into the code.
The DUT (dut.sv)
The DUT is a dummy, empty module with 3 input ports: address, data and clock. In this case study we are only interested on generating the stimuli reaching this module. Therefore, the DUT is as simple as it can be.
module dut(input [3:0] addr, data, input clk);

endmodule
The testbench (tb_sim_top.sv)
The top of the simulation just contains the instatiation of the DUT, the interface required for the UVM agent and the call for UVM to start the tests.
`include "uvm_macros.svh"
import uvm_pkg::*;
import cg_driven_pkg::*;
import pkt_agent_pkg::*;

module tb;

    dut u_dut(
        .addr(pkt_if.addr),
        .data(pkt_if.data),
        .clk (pkt_if.clk)
    );

    pkt_if pkt_if();

    initial begin
        uvm_config_db#(virtual pkt_if)::set(null, "*", "pkt_vif", pkt_if);
        run_test();
    end

endmodule : tb
UVM architecture
The only existing test is called cg_driven_test. This instantiates the cg_drive_env environment object and the sequence to be run multiple times. The environment in turn instantiates a custom-made agent called pkt_agent, which is an active agent in charge of generating random values of data, addresses and clocks. It also constains a monitor that builds transaction objects from the activity seen on the interface connected to the DUT. Finally, the transactions created at the monitor are sent through an analysis port to allow any environment component to use them.
The component that uses these transactions is instantiated directly in the environment, but there is no limitation on where it can be placed as long as it has visibility of the already mentioned monitor’s analysis port. This component, called env_cg, samples the coverage and is extended from the UVM class uvm_subscriber. In essense, the uvm_subscriber class is a component with a built-in analysis export. So we can take advantage of this and connect it with the pkt_mon analysis port. Also, we can instantiate as many covergroups as we may need. The only limitation is that a uvm_subscriber component can only receive one type of transactions using the built-in analysis export. Hence, we may want to create different uvm_subscriber for every different transaction for which we want to monitor the functional coverage.
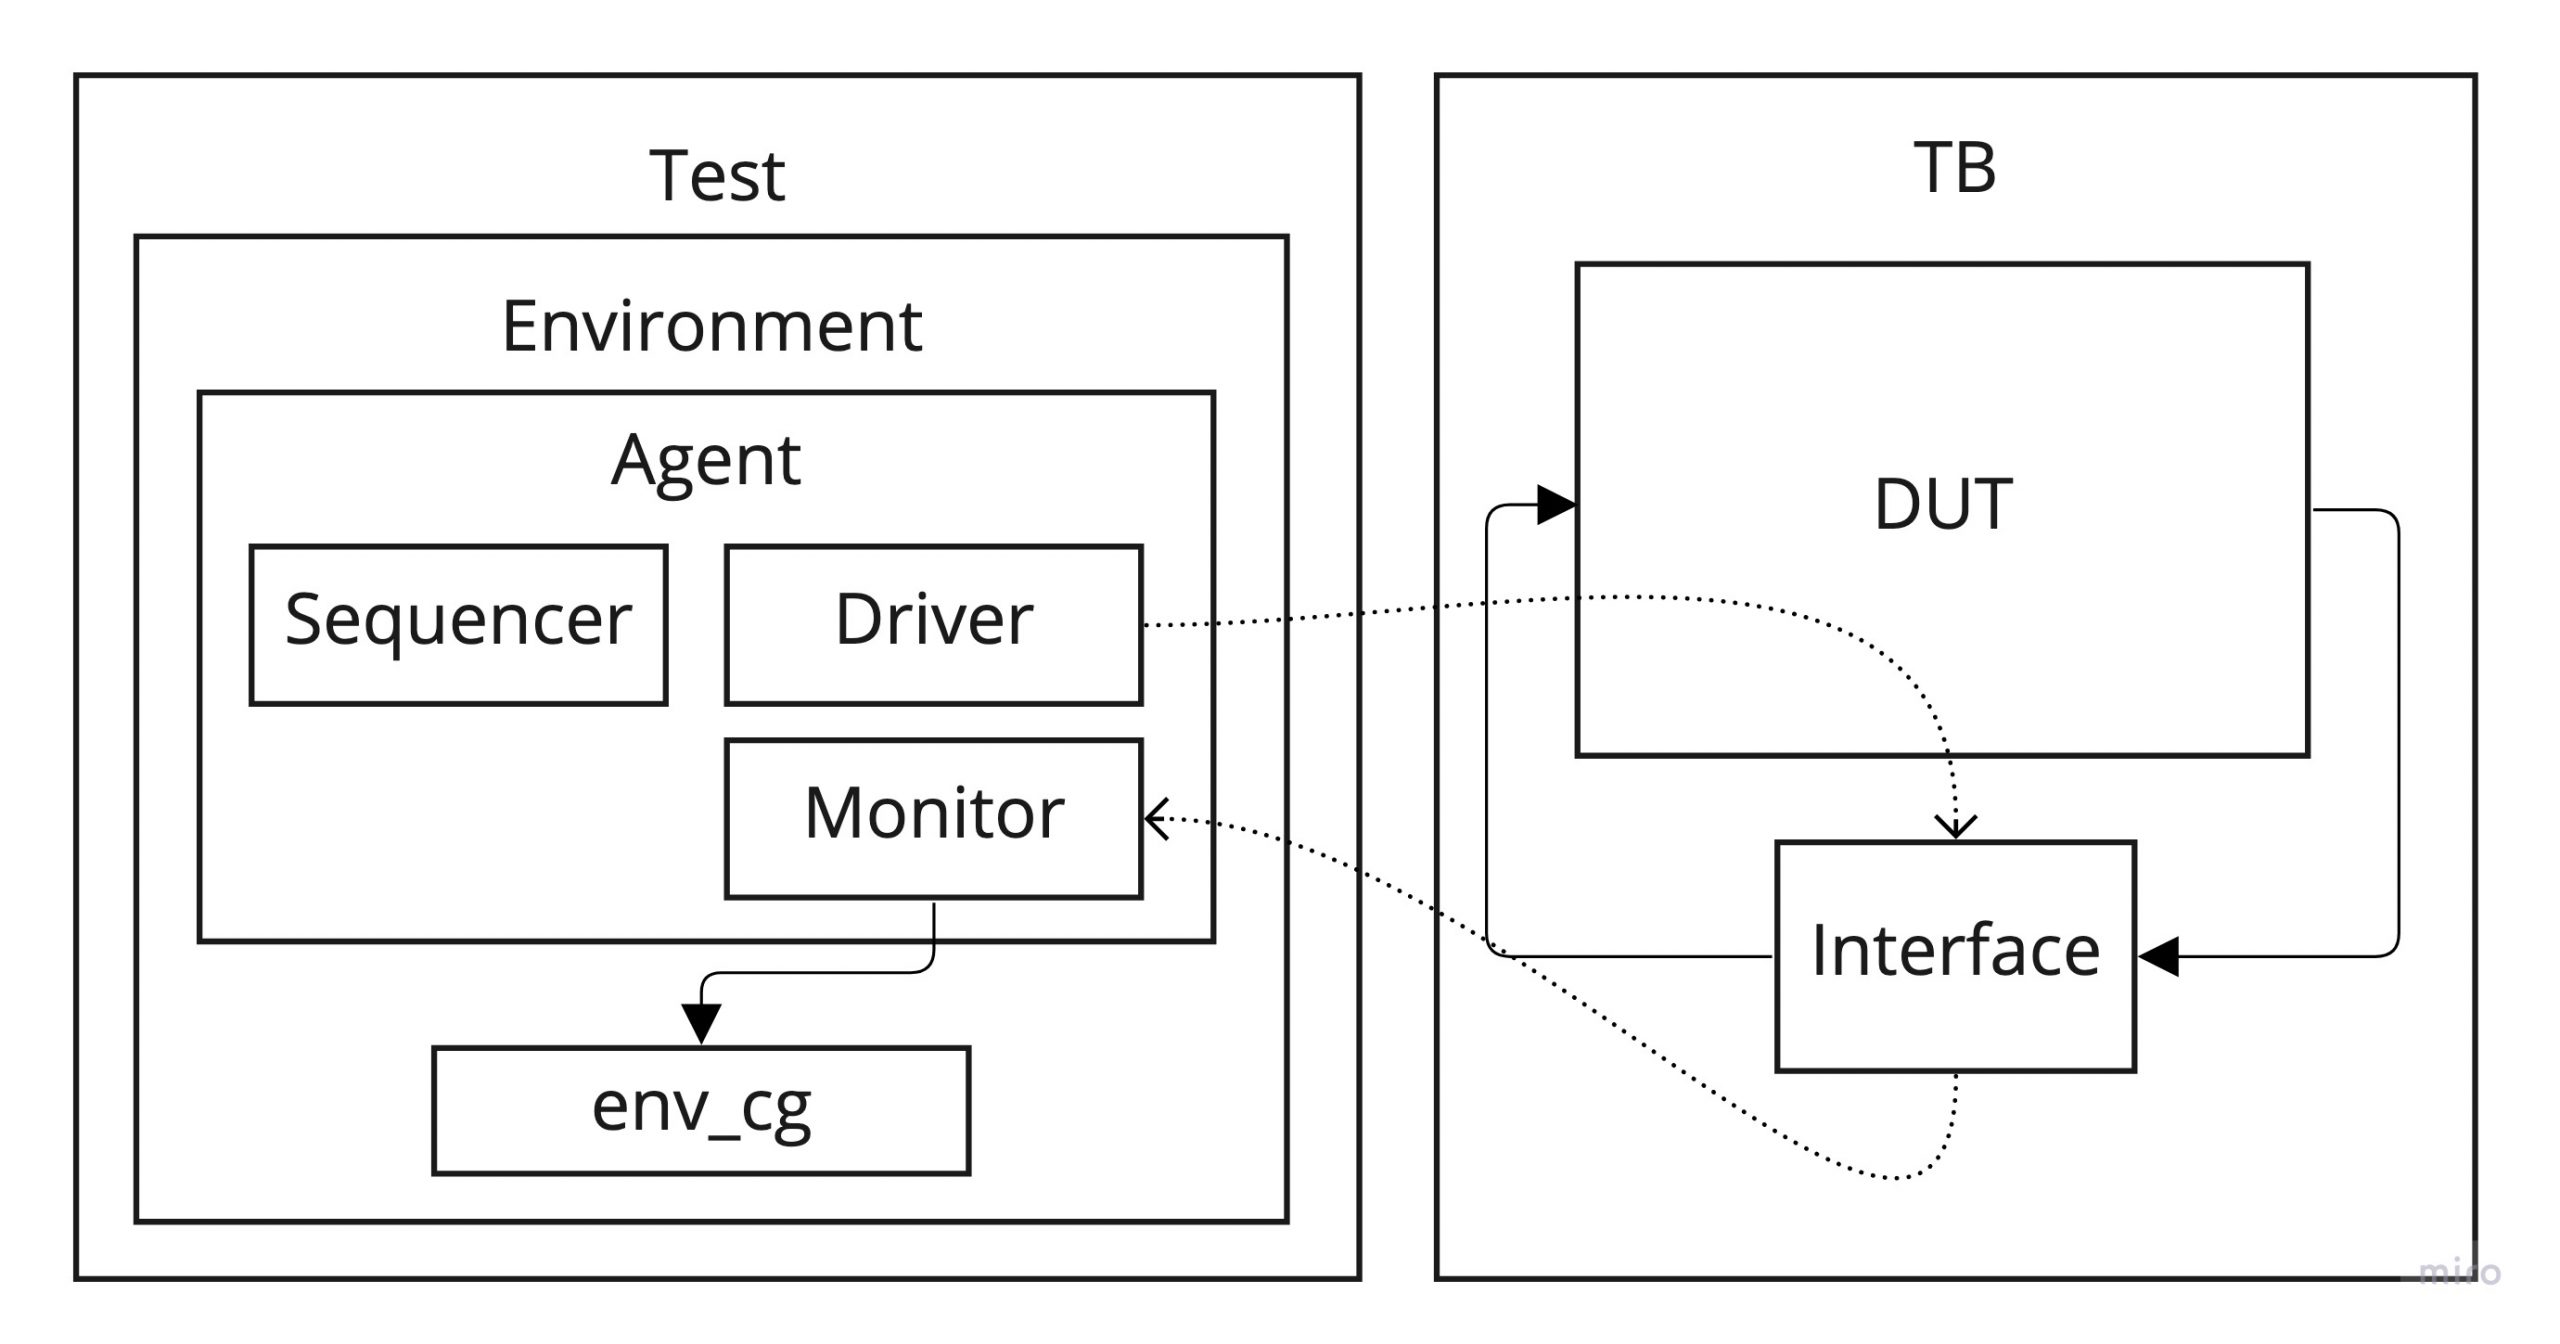
Every time that a new transaction is sent through the analysis port by the monitor, the subscriber function write() is called, so it is a nice place to call for the covergroup sample() method.
import pkt_agent_pkg::pkt_tr;

class cg_driven_subscriber extends uvm_subscriber #(pkt_tr);

    `uvm_component_utils(cg_driven_subscriber)

    pkt_tr tr;

    covergroup cg_addr;
        c_addr : coverpoint tr.addr;
    endgroup

    function new (string name = "cg_driven_subscriber", uvm_component parent);
        super.new(name, parent);
        cg_addr = new();
    endfunction : new

    virtual function void write (pkt_tr t);
        tr = t;
        `uvm_info("SUBS", $sformatf("New transaction received. Sampling coverage"), UVM_MEDIUM)
        cg_addr.sample();
    endfunction : write

endclass : cg_driven_subscriber
We can access the covergroup information from the test through the environment object. We can create a loop that can be repeated as long as the coverpoint coverage is lower than certain value. Since every time that the sequence is executed the driver generates traffic on the interface, the monitor will be able to regenerate a transaction that will eventually reach our subscriber component. Therefore, every time that the sequence finishes, the coverpoint coverage should be updated.
class cg_driven_test extends uvm_test;

    `uvm_component_utils(cg_driven_test)

    pkt_sequence seq;
    cg_driven_env env;

    function new(string name = "cg_driven_test", uvm_component parent);
        super.new(name, parent);
    endfunction : new

    function void build_phase(uvm_phase phase);
        super.build_phase(phase);
        env = cg_driven_env::type_id::create("env", this);
    endfunction : build_phase

    virtual task main_phase(uvm_phase phase);
        super.main_phase(phase);
        phase.raise_objection(this);
        `uvm_info("TEST", "Hello, World!", UVM_LOW)
        #100ns;
        seq = pkt_sequence::type_id::create("seq");
        while(env.cg_subs.cg_addr.get_inst_coverage() < 100.0) begin
            seq.start(env.pkt_agt.sqr);
            `uvm_info("CF", $sformatf("CG coverage = %0.2f %", env.cg_subs.cg_addr.get_inst_coverage()), UVM_MEDIUM);
        end
        phase.drop_objection(this);
    endtask : main_phase

endclass : cg_driven_test
Finally, we can use the method get_inst_coverage() over the coverpoint of interest, which returns a real value with the current coverage. However, we need to be aware that depending on the simulation tool used, the coverage collection might be disabled by default. For instance, in Xcelium you need to add the switch -cov U to enable the functional coverage analysis or -cov_cgsample. Please take a look at the Makefile in the repo to see the exact switches I used.
Conclusion
This is just a simple way to use covergroups inside UVM, which provides the advantage of running just the minimum number of sequences required to fulfill the coverage goals based on one or more coverpoints. This can be very convinient since you can come up with the certainty that if the test finishes, all the targeted scenarios were visited. Of course, this can not always be used and there might be cases where the multiseed approach can boost the functional coverage much quicker. Also, it is possible that due to the nature of the covergroup and the way the stimuli is generated, the test may never reach the goal figure. Therefore, this method might be useful not only to just run the minimum necessary sequences but also to identify possible problems on the way the test is generating the transactions. All in all, it seems quite reasonable to keep this approach in mind since it can work really well on simple cases and can also provide further information on the test infrastructure capabilities.